LAN Configuration Procedure

There are several parameters that you might need to set to establish network communication using the LAN interface. Primarily, you will need to establish an IP address. You might need to contact your network administrator for help in establishing communication with the LAN interface.

If your instrument has the secure (SEC) option, the instrument must be unsecured to change most LAN settings.
  1. Press [Utility] > I/O Config > LAN Settings.
  2. You can select Modify Settings to change the LAN settings, or you can turn LAN Services on and off or restore the LAN settings to default values.

  3. To change settings, press Modify Settings. To access most items on this screen, use the first softkey to switch from DHCP to Manual. With DHCP on, an IP address will automatically be set by DHCP (Dynamic Host Configuration Protocol) when you connect the instrument to the network, provided the DHCP server is found and is able to do so. DHCP also automatically deals with the subnet mask, gateway address, DNS, WINS, and domain name, if required. This is typically the easiest way to establish LAN communication for your instrument; all you need to do is leave DHCP on. Contact your LAN administrator for details.
  4. Establish an "IP Setup."
    If you are not using DHCP (the first softkey is set to Manual), you must establish an IP setup, including an IP address, and possibly a subnet mask and gateway address. The IP Address and Subnet Mask buttons are on the main screen, and you press More to configure the Gateway.

    Contact your network administrator for the IP address, subnet mask, and gateway to use. All IP addresses take the dot-notation form "nnn.nnn.nnn.nnn" where "nnn" in each case is a byte value in the range 0 through 255. You can enter a new IP address using the front panel arrow keys. Do not enter leading zeros.
  5. Configure the "DNS Setup" (optional)
    DNS (Domain Name Service) is an Internet service that translates domain names into IP addresses. Ask your network administrator whether DNS is in use, and if it is, for the host name, domain name, and DNS server address to use.
  1. Set the "hostname." Press Host Name and enter the hostname. A hostname is the host portion of the domain name, which is translated into an IP address. The hostname is entered as a string using the front panel arrow keys to select and change characters. The hostname may include letters, numbers, and dashes ("-").
  2. Set the "DNS Server" addresses. From the LAN configuration screen, press More to go to the second of three sets of softkeys.

    Enter the Primary DNS and Second DNS. See your network administrator for details.

More about IP Addresses and Dot Notation

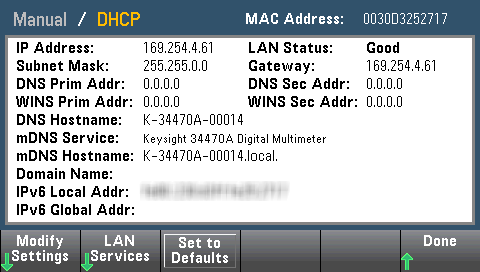
Dot-notation addresses ("nnn.nnn.nnn.nnn" where "nnn" is a byte value from 0 to 255) must be expressed with care, as most PC web software interprets byte values with leading zeros as octal (base 8) numbers. For example, "192.168.020.011" is actually equivalent to decimal "192.168.16.9" because ".020" is interpreted as "16" expressed in octal, and ".011" as "9". To avoid confusion, use only decimal values from 0 to 255, with no leading zeros.